Added: 19 September, 2007
Group: Maya
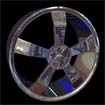
Create a realistic chrome car rims
Author: TechTut.com
page: 2
Tutorial on how to make car rims part 2
Add edge and move them forward a little:

Insert edges:

Bevele edges like on picture:

Create more edges with edge loop tool:

Close edge line with poly split tool:


Add another loops from both sides:

Add more 4 loops:

Delete faces as on picture:

GO to: Page 1 : Tutorial on how to make car rims part 1
GO to: Page 2 : Tutorial on how to make car rims part 2
GO to: Page 3 : Tutorial on how to make car rims part 3
GO to: Page 4 : Tutorial on how to make car rims part 4
TechTut.com This tutorial is copyrighted. Partial duplication or full duplication is prohibited and illegal. Translation or usage of any kind without author�s permission is illegal.


 Join our RSS feed
Use our RSS feed to get the latest published tutorials directly to your news reader.