Added: 8 August, 2007
Group: Photoshop
Drawing a Lamp Tutorial done in Photoshop
Author: Note
page: 1
Drawing a lamp
Drawing a lamp in Photoshop has never been easier. In this tutorial, all three steps of a lamp making process are now more comprehensive than ever. From drawing separate pieces to putting it together.
Made with Photoshop CS3 but the techniques used here are compatible with previous versions of Photoshop. Namely Photoshop 7 and 8.
Step 1. New Document (of course).

Step 2. Make the background white so that we can have a better workspace to work on. Sometimes the white/black/gray/whatever background makes it hard to view things.
New layer, then press D for standard black and white (foreground and background). Then X to switch the foreground and background, and finally, Alt + Backspace so that it fills the whole canvas with white.

Step 3. Create a new layer and here is a brief sketch of what the lamp should look like. This step is crucial in creating your own graphics as you should always have in mind what you are planning on creating. Have a plan!

Step 4. Lets start off with the lower part. Using the Lasso Tool, make a selection like such:

Fill with black.

Duplicate then using the Free Transform Tool (Ctrl + T), enter -100% into the Width: section.


Step 5. Now its time to evaluate. The lamp shape at the top looks too small. Lets use the Distort Transform tool to correct this. Edit > Transform > Distort.

Now, the thing is, we can make the same transform to the other side or simply duplicate it and then reverse the width. Im going to go with just duplicating the left side.

Merge the layers (Ctrl + E).
Next, Im going to cut the top to make room for the oval-ish shape for the top of it.

Making a marquee selection as perfect as that isnt likely on your first try so to edit the marquee, go to Select > Transform Selection.

Then, fill it with black.

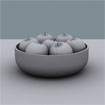
Step 6. Now for that light bulb.
New layer and then a marquee selection:

Fill with any old gray-ish color.
With the main lamp layer selected, Ctrl+Click on the main lamp layer, then while holding down Alt + Ctrl, click on the layer we just created (gray). Now press Ctrl + Shift + I to invert the selection and then press Del.
There, now rearrange the layers so that the gray layer is below the lamp main layer.

Create a layer in between the two other layers.

GO to: Page 1 : Drawing a lamp
GO to: Page 2 : Create a bulb and putting it up together
GO to: Page 3 : Glowing and finishing touch
TechTut.com This tutorial is copyrighted. Partial duplication or full duplication is prohibited and illegal. Translation or usage of any kind without author�s permission is illegal.


 Join our RSS feed
Use our RSS feed to get the latest published tutorials directly to your news reader.